
making your own hat is so satisfying, you’ll wonder why you never made one before. easy as pie!

Materials:
- 1/2 yard hat fabric
- 1/2 yard lining fabric
- 1/4 yard fusible interfacing
- button
- sewing machine/needle & thread
- (optional) ham for pressing
Instructions:
1. lay out the pattern pieces
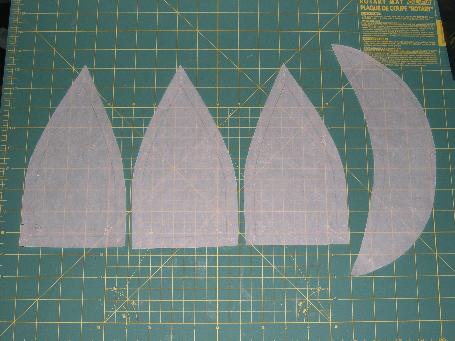
2. pin the pattern pieces to your fabric
3. cut out all the pieces (in hat & lining fabric) and interfacing
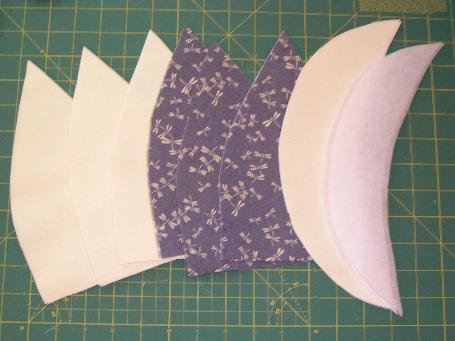
4. on the side pieces, mark the edge closest to the front pieces (this edge is longer and helps with the shape of the hat)
5. fuse interfacing to the peak pieces
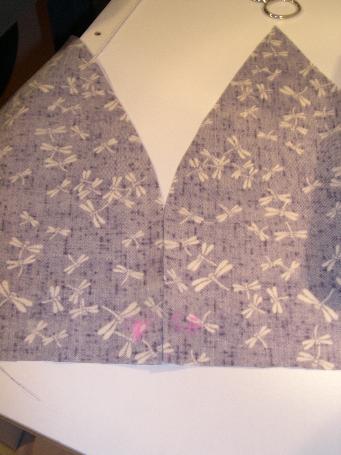
6. with right sides together, sew the back pieces together at 1/2″
7. with right sides together, sew the front pieces together at 1/2″. then sew the side pieces to the front piece
8. press the seams open now (it will be harder to press later, when the hat is assembled)
9. sew the back piece to the sides
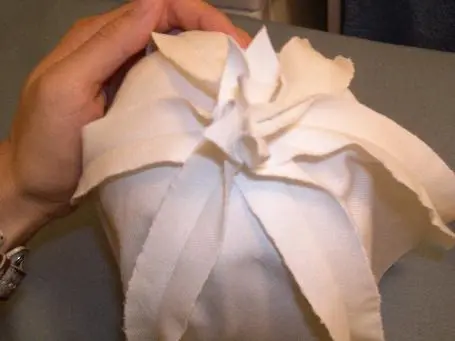
at this point, you can trim some of the bulk off the top.
10. repeat steps 6-9 for the lining fabric.
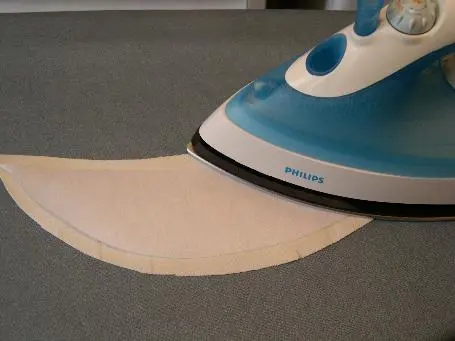
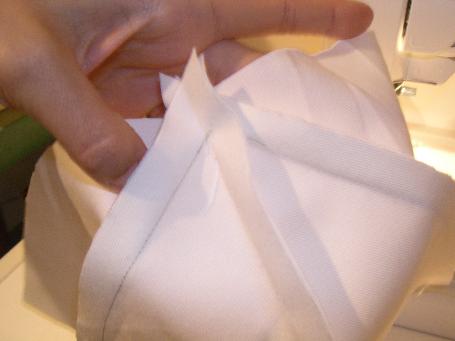
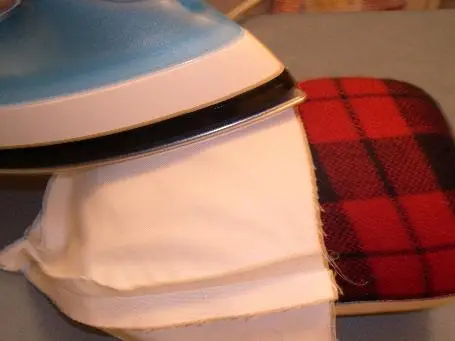
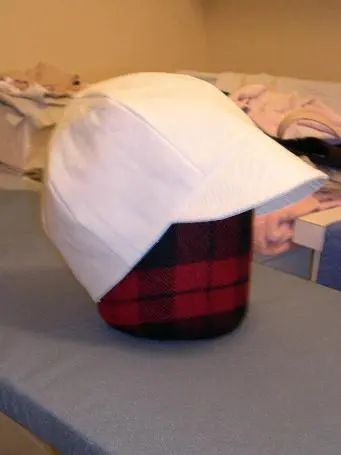
11. with right sides together, sew the peak pieces together at 1/4″
turn the peak right side out and press it flat.
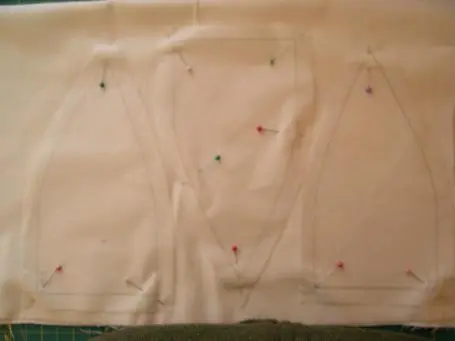
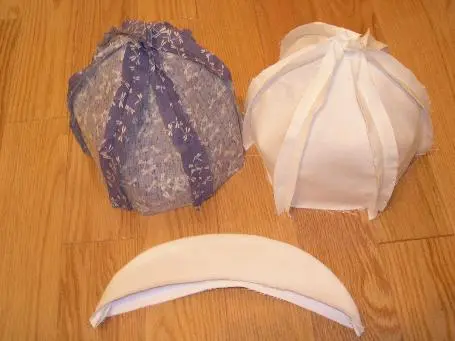
12. you should now have 3 pieces that look like this
13. (optional) topstitch the peak at 1/4″ for decoration.
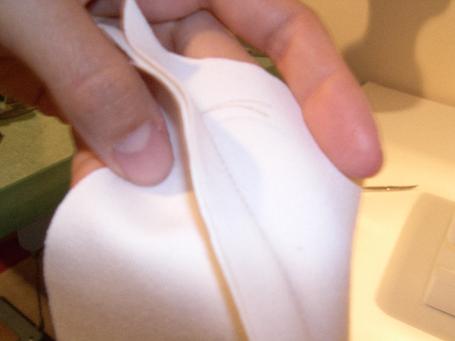
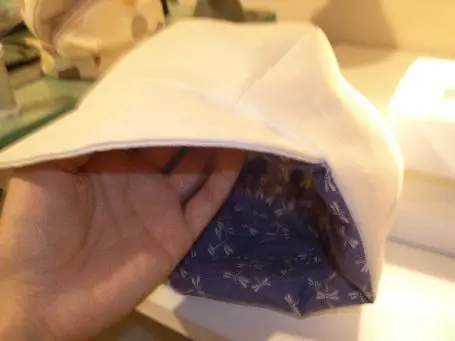
14. with right sides together, pin the peak to the hat
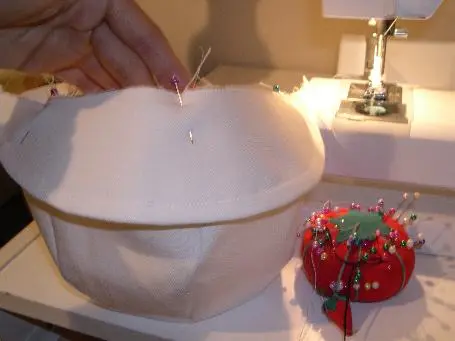
15. lay the hat and peak into the lining (which is inside out)
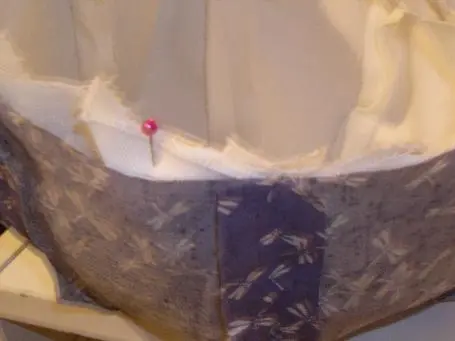
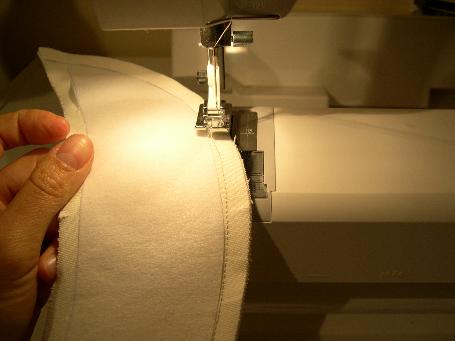
16. beginning at centre back, sew the hat to the lining at 1/4″, leaving a 2-3″ gap
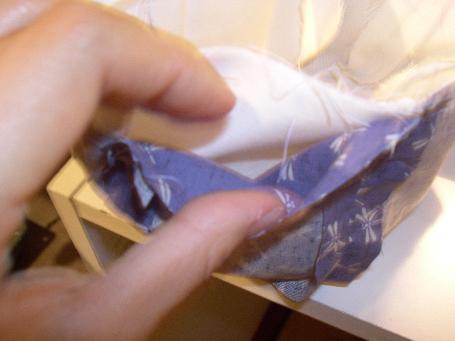
17. turn the hat right side out
18. press the edge of the hat flat
(please excuse the dirty laundry in the background)
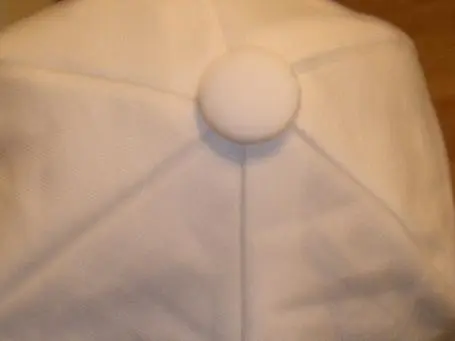
19. blindstitch or machine stitch the opening closed.
20. attach a button to the top of the hat, sewing through both hat & lining (so that the lining doesn’t fall down)
21. ooooh 
* another way of finishing the hat is to leave the raw edges of the hat and lining exposed
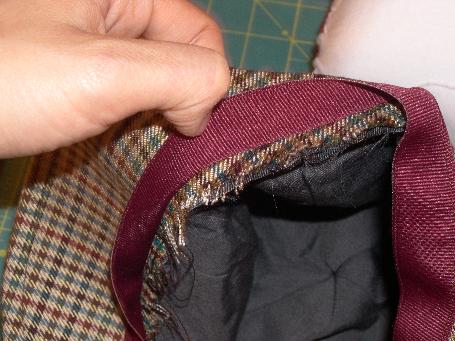
and stitch a grosgrain ribbon over them.

Is there a pattern or did you use a specific pattern otherwise it makes this millinery piece a bit hard to reproduce.
the finished hat looks gorgeous, thank you for sharing this tutorial! how did you go about sizing, is there some math about about it?
hey ladies! yep i used a pattern which makes a hat to fit a head with a 22.5″ circumference (the most common). the seams could definitely be adjusted to accomodate a bigger/smaller noggin.
What a great tutorial. Have linked to this post from my site.
Mia
I’ve made caps very similar to this one, with a larger brim; mine are a little smaller cap, as in baseball cap. See my website, http://www.acsalaska.net/~edie53/crazyquilts/cap/baseballcap.html, and my blog, http://cowgirl53.wordpress.com/2006/09/14/new-hat/ for photos. It does look good in stripes, and they’re fun to manipulate. LOTS of things you can do with this hat!
great idea – very cute hat – is there a pattern you used? or do you suggest just winging it from the picture?
This looks fab! I would love to buy this pattern… can you tell us where we can get it?
i love that hat!!! my church is/has been doing chemo hats for our local hospital; which many of us are doing; also my sister-in-law is going through chemo and i am doing hats for her. Where could I get that pattern! Thanks so much!!!
Just found this tutorial via Tania. Wonderful. Thank you!
It is possible to draft a pattern yourself if you have a little patience. Measure the circumferance of your head just above the ears, where the hat would end. Add maybe half an inch or 1/4 inch for fabric bulk. Measure from your circumferance line up to the top center of your head, where the top of the hat would be. Add about half an inch or 1/4 inch for fabric bulk. Then you take your paper, and draw a vertical line that is as long as the second measurement. Take the first measurement, and divide it by the number of sections, looks like six here. Take that section number and draw a horizontal line at the bottom of the first line on your paper. Then start at the top and draw a shape like in the picture, on one side. All around the outside, draw your seam allowance. Cut the thing out and fold it in middle, and cut the outside edge to make both halves the same. Then copy the other sections from it. Tape it together with tape and see if it fits- if it doesn’t, start over and keep trying. You can use an old sheet from the thrift store or something to draft this up too if you want. When you get the cap right, draw yourself a bill, adjust as necessary, and there you go. Remember if you have it too big, you can add a couple inches of elastic in the back inside, stitch it down. If you have it too small, you can give it to a child. 🙂
Don’t forget to make one out of some adorable fabric and add animal ears and a wee little nose and eyes 🙂
Oh wow, then I see at the top that the pattern is RIGHT THERE- Duh- LOL
That looks fantastic! I love it. Thank You for posting the pattern, you rock! It’s actually just what I needed, my sister will be getting one for Christmas. Thanks Again!
Very cute … nicely done!
~firefly
i love it. this is great for “i want to hide my terrible hair” days. thanxs so much for sharing.
I’ve always wanted to make hats but there aren’t really any milinery schools in South Africa. Thanks for the pattern!
Just finished making a hat from your pattern. Put it up on flickr with some comments. This is the BEST hat pattern ever. The fine detailing by shaping the crown pieces is brilliant.
http://www.flickr.com/photos/glorioushats/414577702/
Will get an article about it on my blog too. Thanks so much and so glad a friend wisted your hat.
I am definitely trying this. Thanks for the tutorial!!!
I just made it too!
Cool pattern!
Probably a stupid question, but I really don’t understand how the brim is attached… Did you turn the hat inside out again when you put it against the lining?Did you pull the brim through the gap you left?
Sew the pieces crown pieces all together, after that sew all of your brim pieces separately, make a small notch
in the center of the brim so that you will know theat the center front of the brim should match to the front center seam of the hat sew the brim raw edge to raw edge of the crown and then sew in your lining. I hope this helps!
This hat is awesome! I’ve been making welding hats for my husband and have been wanting to make myself (a feminine) hat. Thank you so much for this tutorial! I’ll have to give this a try!
Great hat! I put a link to it from my blog so that I will remember to make one! 😛
http://mylittlesewing.blogspot.com/
Hi, I have decorated an ordinary ladies straw hat to look Victorian. Thing is i need to line it now but not sure as to how to do this. I did think of a piece of material circle shape and then over lap it inside to fit and to sew at the top to keep it in place. Hope you can help ?? Sharon , Horsham, uk.
I made this using felt with fabric as the lining, and i added earflaps and bear ears on top
Pingback: M is for « Creating Lace
This is a great tute! I’m so in love with this hat pattern, and I admit i’m usually not the hat-wearing type! Just a question, any tips on resizing the pattern? I think it’d be really cute for my 2 year-old son aswell!
My dd will definitely want one of these. Thanks
That is so cute. You did an awesome job! :]
I was looking for instructions on how to make a HAT; was disappointed to only see instructions on how to make a cap.
Thanks for the awesome pattern and instructions! I just got around to making one, and it turned out really nice.
I think I printed it wrong and just want to check, as mine came out 4.5 inches, which I think makes it 21 inches finished size. What are the flat edges of the hat pieces supposed to measure?
I made one and couldn’t believe how easy it was and how cute it turned out! Thanks!!
sew nice
Pingback: Kopfbedeckungen für Erwachsene - Linkliste (hats, caps and so on, chapeau) | Stoff-Junkie.de
Pingback: Yazl�k �apka dikelim
I just made one of these and I absolutely love it! Thanks so much for the pattern and instructions! I made a couple of modifications to suit my needs and I posted it on my blog 🙂
Pingback: DErya gibideki yazlık şapka dikimi resimli anlatım | Dantel Örnekleri
Pingback: Kopfbedeckungen für Erwachsene - Linkliste (hats, caps and so on, chapeau) | Kostenlose Schnittmuster
Hello my friends!
The interesting name of a site – curiouslycrafty.wordpress.com
I recently 3 hours
sat in the Internet So I have found your site 🙂
The interesting site but does not suffice several sections!
However this section is very necessary!
Best wishes for you!
Forgive I is drunk :))
Check out Online Diet programs
The best online weight loss programs of 2008!
Pingback: arm chair quilting organizer patterns « lazyboy loung chairs
Tks for your nice explanation , very nice of you to share pictures and step-by-step. Do you happen to have a sun hat pattern? I’m trying to make me something to cover the sun out of my face during summer since my face is full of bad sun marks. Hugs and congratulations again!
Pingback: Mad Hatter « Danger Kitty Designs: The Blog
Новый способ давления на кандидата на пост Главы г. Химки
Новый способ “наказать” тех, кто посмел участвовать в выборной кампании не на стороне действующей власти изобрели правоохранительные органы г.о. Химки.
Руководствуясь не нормой закона, а чьей-то “волей” сотрудники милиции решили “проверить” все фирмы, внесшие денежные средства в избирательный фонд неудобных кандидатов.
Начались “проверки” с телефонных звонков – где директор, сколько человек работает на фирме. После чего последовали “письма счастья” с просьбой предоставить всю бухгалтерскую документацию, учредительные документы фирмы, и даже, план экспликации БТИ.
Такие запросы химкинским фирмам рассылает 1 отдел Оперативно-розыскной части № 9 Управления по налоговым преступлениям ГУВД Московской области за подписью начальника подполковника милиции Д.В. Языкова.
И всё это в то время, когда Президент дал прямое указание правоохранительным органам о прекращении всех незаконных проверок малого и среднего бизнеса. С это целью внесены изменения в Федеральный закон “О милиции” – из статьи 11 этого закона исключены пункты 25 и 35, на основании которых ранее правоохранительные органы имели право проверять финансово-хозяйственную деятельность предприятий.
Видно, об изменениях действующего законодательства местные правоохранительные органы не уведомлены. И не смотрят телепередачи с выступлениями Президента.
Может быть, эта публикация подвигнет их к исполнению указаний Президента, а также к изучению и соблюдению действующего законодательства
Pingback: Sew,Mama,Sew! Blog » » February 21 ~ FQ Project of the Day
where do i find out what the abreviations mean and which way I should lay my fabric to cut it? can you help?
@Chris:
CF = center front
CB = center back
Lay out with the flat parts of the upper pieces either with or cross grain (perpendicular or parallel to the selvege). For the brim (peak) draw a line between the little hash marks in the middle. This will be your grain line for that piece.
Good luck!
This is wonderful – thank you for posting such detailed instructions and photos. I’m also making hats and have been trying to wrap my head around a problem: making them adjustable and lined. Aside from ‘hiding’ the elastic (at the back) with grosgrain ribbon, do you (or anyone) have any suggestions? Cheers 🙂
Hi!
Give me link for download XRumer 5.05 Palladium FREE!
Thank you…
Very-very much.
I’m so need this program for promote my web projects! This software is the best thing for online promo and mass posting, you know…
And, dont send me XRumer 2.9 and XRumer 3.0 – that versions are too old!
P.S. Google cant help me((((
Thank you for your pattern and great instructions, I just made your cap from leftover cotton fabric I had made a dress from and it came awesome!!! I even added a matching fabric covered button. Very cool.
Thanks again for sharing..you rock
Guys I ve heard that Inet Bizness booming right now! With all the Newspapers and Radio chanel bancrupt advertisement shifted online! Are you making cash of this web now!
Does anyone knows what should we expect in 2010? they promise more problems on wall stree? I are heading toward dipression?
Hey Everbody
I just joined this forum.
Great work forum crew!
Yesterday I read that there is a treatment for diabetes on http://www.healthcaredaily.org
Can diabetes seriously be cured? The website http://www.healthcaredaily.org looks legit
Has anyone tried beating diabetes this way?
Thanks
snopsymendogs
Hey, you’ll love it. TOTALLY SHOCKING original video whith Alessandra Ambrosio >>
click here Alessandra Ambrosio nude gallary sextape or just follow the link http://digg.com/celebrity/Alessandra_Ambrosio_nude_pictures_naked_video_sextape_3
You MUST SEE it, this girl really beautifull!!!
The best scenes whith Tara Reid (hot and sexy)!
click here Tara Reid nude gallery sextape or just follow the link http://digg.com/celebrity/Tara_Reid_nude_pictures_naked_video_sextape
You MUST SEE it, this chik really beautifull!!!
This is so cute! I’m definitely going to make one. Thanks! 🙂
mp3 download legal mp3 downloads outb036 panacea – bear of berlin 320 kbps terence trent d’arby – greatest hits” 320
I was justified reading a point on how to persuade your down comforter all unimportant again and practically all the answers said that you can relate fool someone some tennis balls in the dryer to make that happen. how to make a tennis ball mortarSo how does that plough exactly? Why does this happen? Can you bring into play something else rather than tennis balls? Thank you!
how to preserve give measure for measure in tennis
IndyCar Series Driver Danica Patrick talks about modeling for the Sports Illustrated Swimsuit Edition.
Danica Patrick 20Q Playboy Interview or just follow the link http://www.youtube.com/watch?v=XZYb4m1nY4g
You MUST SEE it, this girl really HOT!!!
come by virginia slims ultra sunlight cigarettes
second-rate doral cigarette cheaply doral cigarette|penurious doral cigarettes
cheap doral cigarettes shabby doral cigarettes
for peanuts gpc cigarette cheap gpc cigarettes
cheap gpc cigarettes shoddy gpc cigarettes
discount doral cigarettes
I can’t remember exactly how I came across this site–I believe I was researching hats and looking for patterns online–but I think you have some great crafty inspirations here. Why only the four? Do you have anything else to share? The way you explain your processes is very effective.
Cheers,
Otis
Slighhtly embarrassed aqnd with a quick smile to the bus driver, she raeched bheind her to unzip her skirt a little thinking that this would give her enough slack to raise her leg.
Dialect right well turned out trap accept here! My bunk-mate actualy sent me a tie-up! Tolerable serendipity!
I Love this hat pattern!! I made on in 15 mins. It was so great. My daughter loves it so that she asked me to make one for her and so did my sister. I used 2 fat quaters and left the button off so the hat can be reversed. Thank you, Thank you, Thank you.
Похудеть быстро и без особых усилий РЕАЛЬНО!
Суперэффективная диета!
90-60-90 – мечта любой женщины! Но только, как к ней приблизиться? Появилась возможность осуществить свою мечту. На самом деле, похудеть –проще простого!
БЫСТРО, ЭФФЕКТИВНО, БЕЗВОЗВРАТНО, НАВСЕГДА!!!
Новая эффективная разработка ведущих диетологов и терапевтов!
Ее ждали миллионы женщин, которые хотят сбросить лишние килограммы! И, наконец, после длительных проверок и тестирований, появилась супердиета!
Почему набирается вес?
Рацион современного человека все больше состоит из продуктов, вызывающих резкое повышение уровня сахара в крови. После принятия такой еды, уровень сахара в крови резко растет. Организм, реагируя на это, снижает уровень сахара инсулином, который выделяет поджелудочная железа. Так, как сахара в крови много, и появился он за короткое время, то организм спешит как можно быстрее снизить его уровень до нормы, и вырабатывает избыточное количество инсулина. Лишний инсулин, провоцирует увеличение запасов жира.
Механизм образования жировых обложений можно сравнить с тушением огня. Горящие ветки или бумага тушатся спокойно, когда примерно представляешь, сколько понадобится воды. А если вспыхнет стакан спирта, тогда на эмоциях можно вылить чрезмерное количество воды, залив все вокруг.
У худых людей поджелудочная железа “сильная” – количество инсулина пропорционально количеству избыточной глюкозы. И это возможно, благодаря наследственности. У склонных к полноте “слабая” – значительная инерция процесса выделения инсулина. Но не надо отчаиваться. Чтобы восстановить оптимальный вес, необходимо отказаться от продуктов провоцирующих резкое повышение сахара в крови. Вспомните свои ощущения, когда Вы едите эти продукты – они очень вкусные, и Вы получаете от еды удовольствие. Закончив трапезу, Вы встаете из-за стола с чувством «сытости» и тяжести в желудке и теле. Через полчаса сытость проходит, какое-то время – состояние равновесия, и затем снова хочется есть.
Отсюда, три фазы:
1. Повышение уровня сахара в крови – удовольствие.
2. Уровень сахара близок к 1 – равновесие.
3. Уровень сахара ниже нормы – чувство голода.
Обратите внимание – действие сахара подобно действию наркотика: принял – получил удовольствие, действие закончилось – началась «ломка».
И отказаться от его употребления для некоторых очень трудно, почти невозможно.
Человечество существует сотни тысяч лет, и только в последние сто лет так резко изменился состав продуктов. Почти на каждой этикетке написано, что в состав продукта входит сахар. Никогда в истории не стояла так значительно проблема похудения.
Скажите СТОП лишнему весу! Узнайте, какую суперэффеективную диету мы Вам предлагаем!
Самая лучшая диета даст возможность приобрести Вам то, о чем многие только мечтают:
Используя несколько очень простых, но эффективных правил диеты, Вы перестанете объедаться и испытывать чувство вины из-за того, что не смогли вовремя остановиться.
Диета позволит Вам научиться слышать себя и понимать, что и когда Вам нужно съесть.
Диета позволит Вам полюбить праздники и перестать переживать из-за того, что Вы наберете за праздничные дни несколько килограммов.
Очень простые правила диеты помогут Вам научиться избегать срывов и случаев переедания.
Соблюдение условий, описанных в супердиете, поможет Вам сдвинуться с “мертвой точки” – возобновить остановившийся процесс потери лишних килограммов.
Вы сможете обходиться без утомительного подсчета калорий.
Вы узнаете несколько секретов, которые позволят тебе худеть, даже если Ваш холодильник битком набит продуктами, и Вы регулярно наведываетесь в супермаркет за чем-нибудь вкусненьким.
Вы научитесь использовать различные продукты в качестве лекарства.
Вам больше никогда не придется с завистью смотреть на тех, кто может позволить себе любую еду. Ведь и для Вас не будет запретов!
Вы обретете уверенность в себе и в своих силах.
Вы поймете, о чем Вы мечтаете, к чему стремитесь и начнете идти к своей цели, не замечая преград.
Вы получите подробную пошаговую стратегию обретения навыков здорового питания и избавления от лишнего веса.
Удивите своих подруг и близких – похудейте на 10 кг за 1 месяц! Худейте без особых усилий! Избавьтесь от лишних килограммов!
Наша супердиета поможет Вам скинуть 10 кг за 1 месяц!
“Это невозможно!” – сказала Причина.
“Это безрассудство!” – заметил Опыт.
“Это бесполезно!” – отрезала Гордость.
“Попробуй…” – шепнула Мечта.
Мы поможем воплотить мечту в реальность! Вы увидите результат уже через 2 недели! А еще через две – Ваша талия уменьшиться на 5 сантиметров!
Но и это еще не все!
http://dtm234.ucoz.ua/index/xud/0-10
Вы верите своей второй половине?
По статистике 96% супружеских пар изменяют.
Вы хотите знать правду? Многие считают, что всё лучше не знать. Другая часть витает в «облаках доверия».
Мы не хотим разрушать вашу личную жизнь. Но мы хотим, чтобы вы были в ней уверены, чтобы у вас была возможность предотвратить события. Мы можем дать Вам возможность доступа к другим мобильным телефонам. С этих пор чтение чужих сообщений, а также информация о входящих и исходящих звонках вовсе не является тайной!
Нужно лишь ввести код мобильного оператора и номер абонента.
http://gpscontroller.3dn.ru/
Культура финансово-кредитной политики поддержки малого предпринимательства на местном и региональном уровнях Мировой финансовый рынок. Влияние корпоративной культуры на процесс управления персоналом организации. Влияние ТНК на мировые финансовые потоки.
информационная экономика
Pingback: A hat « kiikikutoo
I made this hat on Tuesday night and on Wednesday I went to the store to buy the supplies to make one for everyone I know for Christmas! I used flannel for the lining and it made them so cozy. So far I’m made 5 of them. Thanks for posting this!
GPS оборудование
GPS – глобальная система позиционирования, определение местоположения путём измерения расстояний до объекта от точек с известными координатами — спутников. Расстояние вычисляется по времени задержки распространения сигнала от посылки его спутником до приёма антенной GPS-приёмника. То есть, для определения трёхмерных координат GPS-приёмнику нужно знать расстояние до трёх спутников и время GPS системы]. Таким образом, для определения координат и высоты приёмника, используются сигналы как минимум с четырёх спутников.
GSM оборудование
GSM-системы (on-line системы) позволяют получать информацию от оборудования мониторинга по каналам передачи операторов мобильной связи. Таким образом, съем информации с оборудования происходит в любой момент времени без непосредственного доступа к нему. В этом состоит основное преимущество GSM-систем перед off-line системами, требующими непосредственного подключения модулей мониторинга к персональному компьютеру. Наше оборудование поддерживает все технологии передачи информации по сети GSM: SMS, CSD, GPRS, Voice.
Счетчики топлива
Применение топливных счетчиков позволяет предприятиям получить объективную информацию о времени работы машин, вести постоянный контроль реального потребления горючего. При помощи DFM можно разработать нормы расхода ГСМ на отдельных маршрутах и технологических операциях.
Экономический эффект применения приборов учета топлива различен на разных предприятиях, обычно от 10 до 40 %, в зависимости от запущенности исходной ситуации и настойчивости менеджмента автопредприятия.
Link: http://gps-group.at.ua/
Что то в верхнем углу высплыло, и Каспер показал что сайт заражон вирусом,
аффтар, да у тебя iframe вирус …
THANK YOU.
I’ve made 3 of these so far. This last one? Modifying it with button on earflaps. Flannel lining. This pattern is wonderful.
Hi I am desperately looking for some instructions on how to attach netting to a pillbox hat. I am really excited about the finished product but I just cant find any instructions on how to go about it. 🙂
Any ideas Anna
Мне вот кажется, что такое написать мог то ли креативный гений, то ли героиновый наркоман 😦
<a href="http://www.yourcheaplaptops.com"very cheap laptops
Если ты споришь с идиотом, вероятно, то же самое делает и он.
Не очень люблю такие тексты %:(
Thank you so much for the pattern! I had a practice version, then I altered a little and came up with my own! Come check it out on my website.
Pingback: Ralph Lauren Spring 2010 and Sullivans Travels/Veronica Lake « Design Soiree
awesome, i just finished mine, and it looks so cute…
thanks from mexico.
Pingback: Kindermütze im Capstyle (engl.) | ♥ Bloggarten ♥ - Freebies
Естественно, на самом-то деле так оно и есть. 🙂
Слишком понравилась новинка. полистал заметки, то скажу, собственно креативите довольно познавательно и выбираете важные темы информации. Грандиозное Спасибо!!!
I believe I just have been informed about this topic
at job 2 days ago by a friend, but at that time
it didn’t caugh my attention.
Hello.
I the beginner.
The exclusive is assured it of 100 %,new Pic
http://ariagiovanni-nude.blogspot.com
Love this pattern….easy as; and the finished product looks great.
Thank you so much for sharing this….you’re a gem.
Lorraine
Australia
i saw a woman wearing a hat like that today and it looked so cool on her. i was thinking on sewing one for myself and googled until i found your site. i’m going to make that hat! thanks a lot, you made my day!
I made a few of these hats for my aunt who is going through breast cancer chemo for the second time. She wore one of the hats to a wig shop today and the shopkeeper loved it. The owner asked if I would make them to sell in her shop.
I saw your creative commons license, so I knew I had to ask you first. I would like to pay you for the use of your pattern so I may do this.
Please contact me soon at your convenience so I can let them know. Thanks ever so much!
Pingback: DErya gibideki yazlık şapka dikimi resimli anlatım > DErya gibideki yazlık şapka dikimi resimli anlatım tarifi > Dantel Örnekleri Dantel Modelleri Oya Örnekleri
Видел где-то на форуме что кто-то искал возможность активации Windows 7. Не смог найти топик, поэтому создал эту тему.
Долго пришлось искать в интернете этот активатор, так-как мне самому она была нужна для активации моей винды. Опробовал разные активаторы, но реально активировал свою операционку программой Windows 7 Loader, которую нашел на этом сайте.
Вот, активировал себе, решил поделиться с другими 🙂
На нашем блоге о создании сайтов Вы всегда сможете почитать интересную информацию о раскрутке вашего проекта, а также о заработке в twitter . Наш каталог поможет сравнить Вы также на моем блоге сможете бесплатно скачать базы каталогов для продвижения
Хотите купить квартиру? Вам нужно узнать, как правильно купить квартиру? объявления недвижимость бесплатно.
awesome, i just finished mine, and it looks so cute…
thanks from mexico.
Рыбалка на новый год в Майами, в Океане. Ловим Grouper, Marlin, Mahi Mahi, Dolphin . Инструктор Феликс. Мы предлагаем экскурсии для Вашей семьи, напитки и обед включен. Самые лучшие условия для Вас. http://www.youtube.com/watch?v=SIzN8RYK4XI
thansk very good.
бонусы казино
Help, I need a pattern for a cowboy hat to fit a beanie baby! Maybe a little bit larger. I want to make it out of leather fabric. I do not know howto make the hat part I cannot figure out how to make a top hat or the shape to make the bream. If anyone has a pattern please help. I need it by Sat. Jan. 22 must have it complete by Sunday. This is for a school project. Mole Day. Thank You Ginger
Pingback: what’s in a hat? « Ninja Designs
просмотр бесплатный порно
where do I get the pattern from?
Хороший пост! Одобряю
Looks awesome great tut
Скайп – это полезный инструмент для работы. Его экстраординарность заключается даже не в том, что при помощи такого оборудования можно общаться, и можно лицезреть лицо своего второго абонента на мониторе, – этим в наше время мало кого удивишь, – а в том, что осуществлять это возможно за совсем маленькие деньги, в круглосуточном режиме, в том числе, и на работе.
Рабочее место, снабженное скайпом, дает возможность общаться с заказчиком, коллегой, партнером так, словно он находится здесь же, впомещении. Качество связи помогает подмечать мимические реакции собеседника, которые подчас бывают ценнее, чем его ответы, выраженные в словесной форме. Скайп позволяет быстро связываться с другими людьми, обсуждать даже самые незначительные детали работы, и следовательно, выполнять ее в оптимальном соответствии с заявками заказчиков.
Однако для того, чтобы пользоваться возможностями оборудования в полной мере, следует не просто купить все необходимое оборудование, в частности камеру и микрофон. Важно также приобрести и установить все нужное для нормальной и высокоэффективной работы оборудования программное обеспечение. Конечно, его возможно купитьприобрести через сеть, или в произвольном из магазинов, реализующих всевозможные программы и компьютерные игры, но можно также скачать скайп бесплатно – также, посредством использования услуг нужных вам сайтов. Сейчас каждый пользователь может претендовать на эксплуатацию бесплатных программ для скайпа, имеющих достаточно высокое качество и другие характеристики.
Используя скайп, человек платит исключительно за трафик. И благодаря данной особенности этого варианта связи, важно осуществлять международные и междугородние переговоры совсем дешево, сберегая при этом весьма серьезные суммы. Скайп дает возможность осуществлять онлайн – конференцию, связываясь сразу с несколькими абонентами для решения многочисленных проблем, что и делает данный сервис очень даже полезным и эффективным инструментом для работы.
Но эксплуатировать скайп именно для работы совсем необязательно. Каждый человек может оборудовать его у себя в домашних условиях, чтобы в полной мере разговаривать с друзьями и родственниками, в том числе, и живущими в других районах, а то и вовсе за рубежом. Эксплуатация скайпа в жилище, для личного удовольствия, также помогает сохранить немалоденег, и обеспечивать при этом постоянное общение с проживающими далеко абонентами. Это очень важное и удобное оборудование.
Moncler men boots
Moncler sito ufficiale
Moncler Jackets sale online
Moncler jacket
official
Moncler Coat Official
Moncler jacken official
Hi! Thanks for sharing such a fun pattern! I realize it has been a while since you posted this, but I have a question and fingers crossed you will get back to me. It’s my very first hat project, so forgive me 🙂
When I cut out the two pattern pieces for each section (front, back sides), do I first fold my fabric in half, then trace and cut out the pieces? So essentially, when the right sides of the front pieces are facing each other for sewing, the center marks and longer edges will be lined up? Or do I lay out my fabric then trace and cut the two pieces individually?
I hope my description makes sense! Thank you so very much!
Привет всем
вот моя история:
я долго не могла похудеть после беременности
весела 80кг 😦 (а раньше 60кг)
но вот нашла диету
Вот она ДиетА
прошла тест
и скинула за 2 месяца 18кг
Вы не поверите но она работает
I just like the valuable information you provide in your articles. I will bookmark your blog and test once more here regularly. I am fairly sure I’ll be informed plenty of new stuff proper here! Good luck for the next!
Это касается всех. Скоро новый год и на это время все забудут про то сколько нужно кушать. И многие могут легко нахватать лишних килограммов. Но чтобы этого избежать и так сказать подготивься ко всему есть специальные методики. Чем раньше начать заниматься тем лучше. Можно будет и в новый год погулять хорошо и о фигуре не беспокоиться, но только не забывать и после праздника поддерживать себя в форме.
Чтобы получить этот курс проидите по этой ссылке:
http://tvoya-dieta.tk
Откровенные эротические видео чаты с девушками !!! Вас ждет
незабываемое общение в бесплатном чате. В платном чате наши девушки
готовы на многое, но самое большое удовольствие Вы получите в
привате… Здесь Ваши фантазии воплощаються в жизнь!
http://urlx.ru/BVH заходи, не пожалеешь.
Лендинг Одноклассники ru.
Сексоклассники
Редкие документальные, , очень редкие! на вебдип точка ру webdeep.ru.
?? ????? ????? ?? ?????? ????????????? ? ??????????????.
–?????????????? ?????????, ??????
–??? ??????????????
??????????????
Мастерок интернет-магазин строительных и отделочных материалов в Новосибирске
Pingback: kiikikutoo » A hat
Pingback: ¡¡¡QUIERO LECHE CON CHOCOLATE!!! | A R D A
афыафыаыа фаыаф
Приветствую
Срочно нужна информация касаемо ипотека в сбербанке отзывы Может быть произошли изменения. Вообщем ищу наиболее адекватную времени информацию!
Hello, i think that i noticed you visited my website thus
i came to return the choose?.I’m trying to to find issues to enhance my site!I assume its ok to use a few of your concepts!!
I like the helpful info you provide in your articles.
I will bookmark your blog and check again here regularly. I am quite sure
I will learn a lot of new stuff right here!
Best of luck for the next!
Very soon this web page will be famous amid all blogging visitors, due to it’s nice articles or reviews
You actually make it seem so easy with your presentation but I
find this topic to be actually something which I think I would never understand.
It seems too complex and extremely broad for me. I’m looking forward for your next post, I’ll try to
get the hang of it!
Because the admin of this web page is working, no question very soon it will be well-known, due to its quality contents.
I pay a quick visit every day some websites and information sites to read content, however this blog presents feature based content.
When I originally left a comment I appear
to have clicked on the -Notify me when new comments are
added- checkbox and now whenever a comment is added I get four emails with
the exact same comment. There has to be an easy method you can
remove me from that service? Thank you!
Ahaa, its good discussion about this post at this place at this blog, I have read all that, so at this time me also commenting here.
Great pattern! Made some to donate. 🙂
Pingback: November 27 ~ Gifts for Warmth | Sew,Mama,Sew! Blog |
Excellent beat ! I wish to apprentice at the same time as you amend your website, how could i
subscribe for a weblog web site? The account helped me a acceptable deal.
I have been a little bit familiar of this your
broadcast provided shiny transparent idea
This really is a very good blog, thank you due to this.
I had so that you can yahoo and google intended
for various hrs to uncover this particular area.
I really dislike as soon as whenever My spouse
and i bing with regard to reports so that you can verify I always attain ineffective content articles plus lots
trash.
You actually surprisingly bring caution with every one of the
junk plus retain your website distinct in addition to high quality.
Will you have any means of my own personal blog?
i really love it! thanks for ur creativity 🙂
i have an enquiry plz — how much the scale of pdf ?
Металлопрокат в Санкт-Петербурге по ценам производителя только у нас!
Наша компания занимается реализацией чёрного и цветного металлопроката по ценам ниже рыночных, т.к. мы работаем напрямую от производителей и можем дать фору большинству металлобаз Петербурга!
Всегда в наличии арматура, швеллер, балка, уголок,лист металлический, труба и многое другое…
This website was… how do I say it? Relevant!!
Finally I have found something that helped me. Cheers!
I live in Canada which is a little cold in the winter. I made this hat for a chemo patient so her head would be warm. She loved it. I am making another one for a different girl. (Both hats were made with fleece and a cotton lining.) Thanks for your creativity.
Marge
Thank you so much for the pattern and tutorial. I just started chemo yesterday and have been looking for a hat just like this. Thank you so much!
impotencja-cialis1.pl
http://impotencja-cialis1.pl
http://impotencja-cialis1.pl
Do not contemplate yourself respecting the usurp of coughs, colds, or deject while you are pleasing this pharmaceutical without asking your doctor or robustness mindfulness unmitigated on the business of unimaginative‘nesis
Лучший Тариф
http://besttariff.ru/ – Взять кредит>>>
Najważniejszą rzeczą, którą wypada odznaczyć wobec uwagę to, iż prawie wszystkie sieci web użytkownicy go online, tak aby dążyć informacji, negacja logiczna koniecznie przechadzać się zaś kupić
coś. Przede wszystkim czuć witryny pełne treści oryginalnej, istotne więc przydatne. Ludzie będą ubóstwiać artykułów, które są atrakcyjne i
pomocne. Należy pamiętać, iż w Internecie, treść jest przed siebie królem dlatego dobrej jakości treści będzie nie na odwrót wznosić wiarygodność, może ona jednocześnie pomóc
możesz uzyskać wyższe zrewidować silnik. Publikując istotne oraz przydatne artykuły, wolno urządzać siebie kiedy wiarygodnego eksperta wewnątrz tej dziedzinie,
co jest w wyższym stopniu wiarygodne etatowym produktu lub usługi, promocji. Ustanowienie dobrej reputacji jest wyborny krok ku wnętrzu budowaniu lojalnej
podstawy konsumentów. Konkurencja jest bardzo mocno do wnętrza świecie Internetu. Zawsze musi przebiegać jeden krok poprzednio rywali do zapewnienia, że jest dozwolone łapać istotne
udział ku wnętrzu rynku docelowego. W związku od tym, wypada użytkować wszelkich możliwych środków do zachęcania ludzi nie wprost przeciwnie aż do odwiedzenia witryny, toż plus kliknąć i
Aby ukończyć do pobliże odtąd produktów toteż usług, którą promują. Budowa opt-in mejl listy jest jednym od tego czasu najlepszych sposobów, iżby nazbierać perspektywy.
Oferta biuletynu czy też e-zine. Jeszcze bardziej odpowiednio oferują zachęty aż do do potencjalnych klientów, ażeby wciągnąć ich aż do subskrybowania biuletynów. Można
obecne pora dnia oprogramowanie, admitancja aż do ekskluzywnych usług przeto innych gratisów, które będą pomocne do potencjalnych klientów.
Ważne aparat #3: Link Popularity
Znaczenie z trudem ukierunkowane ruchu aż do Twojej witryny negacja logiczna kto wie oczekiwać kompletnie podkreślone. Wszystkie teren akcja jest wewnątrz górnej części
wykaz najważniejszych podmiotów w świecie Internetu. Przyciąga ludzi do witryny winien lenić się pierwszym krokiem, który trzeba przeprowadzić. Czy
wszystko, iżby osiągnąć posępny przeprowadzić rewizję silnik. Link Popularity jest jednym odtąd czynników, które przeszukać silniki służy do określenia Wyszukiwarka
rankingi. W związku z tym w środku celu zwiększenia odsyłacz popularity, musi zainspirować kampanię agresywne wzajemne powiązania.
Jednym według najlepszych sposobów, żeby owo zrobić-bez żadnych kosztów wewnątrz ogóle-jest przedstawieniem artykuły z witryny link ku wnętrzu polu zasobów, e ziny więc wolna
stron artykułu. Nie przeciwnie zyskasz ekspozycji, masz dodatkowo opcja reklamowania w ciągu darmo, potem prostu słychać odnośnik aż do Twojej witryny.
Więcej witryn możesz zakwaterować artykuły do, lepszy odnośnik popularity jest. Zrobić swoje artykuły, oryginalny, istotne zatem przydatne tyle, że więcej
stron internetowych będzie wzgląd ono wewnątrz górze a później to.
Są aliści trzy według wielu narzędzi, które affiliate marketingu jest dozwolone użyć, ażeby zmaksymalizować wytyczna zarobkowy. Możliwości są nieograniczone wobec tego są
ograniczone wyłącznie przez wyobraźnię, kreatywność, przedsiębiorczość wobec tego determinacji. Zawsze możesz przejrzeć inne pomysły więc adaptacja innych strategii,
co myślisz, iż a nuż przynieść ulgę Ci stać się groźny toczenia affiliate marketingu.
profesjonalne pożyczki pozabankowe wrocław
pożyczki pod zastaw wrocław chwilówki
pożyczki pod zastaw nieruchomości wrocław online
pożyczki bez bik wrocław chwilówki
pożyczki pozabankowe wrocław raty
hello, any tips on making the pattern larger?
Reviewing the photographs of your Istanbul escorts is very important as a result of solely then it is possible for you to to know whether the escort service provider you select is appealing to you or not. There are various impressive service suppliers in the Istanbul escorts trade. You may rent these top class escorts in a wide range of situations. You may rent your escorts even on valentine’s day. As long as you’re ready to pay the correct value for your escort it is possible for you to to get the most effective companies. So choose your escorts service providers carefully and pay the suitable price, you’ll be able to actually benefit from the providers of high escorts in Istanbul.
fargo s01e05 vost
dj fx effect
microsoft active directory
mr . fraud
this was built to make you dance
olive kitteridge part 3 720p
sword art online II english sub
anikka albrite anikka
the good wife s06e03 720
#dshsrgmgdmgkmgjkcmporrimr#
Clean atmosphere!!
Nice use of lavender in this work mate
Nice use of lavender in this work mate
Оптимизация и продвижение сайта в поисковых системах – это следующий важный шаг после создания любого веб-ресурса. WEBSITE POSITIONING (от англ. search engine optimization) один из основных и наиболее эффективных инструментов по привлечению целевых посетителей на сайт.
Продолжу для тех, кто все же остался послушать, о чем у нас тут поют. Так… Давайте начнем с сути понятия, что же такое Search engine marketing, откуда у него растут ноги и как его использовать в мирных целях продвижения своего сайта. В начале, наверное, будет много воды, особенно для тех, кто уже в теме Сео продвижения, но для начинающих, думаю, это поможет убрать некоторый сумбур из головы.
Т.е. вы должны понимать, что Search engine optimisation реально работает и не использовать его было бы большой оплошностью. Ваши потенциальные читатели, которые не смогут найти ваш замечательный сайт через Яндекс или Гугл, вам этого не простят. Мало создать хороший сайт с уникальным и нужным контентом, его обязательно нужно продвинуть в Топ 10 поисковиков хотя бы по ряду не очень частотных поисковых запросов, чтобы начать привлекать к себе внимание читателей.
Методы seo-оптимизации рассчитаны на поисковых роботов. Здесь главное – не переборщить. Ведь статьи читают люди. Привести в порядок сайт конечно надо. Но не в ущерб читаемости (если конечно это сайт для людей, а не для рекламы). Лучше готовый текст прикупить где-нибудь типа текстсейла. Там уже все будет «заточено» под оптимизацию. Есть еще способ продвижения комментариями. По сути, это мини-статья, которая отлично индексируется. Только надо следить за уникальностью текста. Это и посетителей даст.
Принято считать, что первым вебсайтом был и появился он в 1990 году. Создателем страницы именуется Тим Бернерс-Ли (Tim Berners-Lee) и первое, что было опубликовано на той странице – это описание принципа работы World Extensive Net, протокола HTTP и языка HTML. Впоследствии этот сайт был превращен в каталог и на сегодняшний день он используется, как музейная страница.
Как известно, каждый веб-сайт имеет свое уникальное имя. Нельзя, допустим, набрать адрес и попасть на два разных сайта – каждый ресурс имеет уникальный адрес и даже, если адреса внешне схожи, то различие в них скрывается в последнем разделе (после точки) – data, com, internet, biz, ru и т.д. Дабы не морочить читателю голову занудными объяснениями из разряда, что такое DNS, gTLD, ccTLD, идентефикация областей и т.п. мы проиллюстрируем структуру имени сайта на простом примере самого популярного сайта в Интеренете под названием wikipedia.
Существует три вида SEARCH ENGINE MARKETING – белый, серый и черный. Деление на такие группы весьма условно, но оно есть – во всяком случае, в специализированных статьях часто упоминаются именно эти три термина.Различие между ними настолько размыто, что на современном этапе, практически одни и те же действия, только слегка отличающиеся друг от друга, могут привести к тому, что сайт будет забанен поисковиком или же, наоборот, получит дополнительный трафик.
Таким образом получается, что оригинальный контент это не только залог успеха для владельца определенного сайта, но и источник постоянного дохода, для тех, кто имеет склонность к написанию статей, обзоров и прочих текстовых материалов на определенную тему. В этой небольшой статье, мы рассмотрим такое явление, как WEBSITE POSITIONING-копирайтинг и дадим практические рекомендации для тех, кто желает посвятить свое время этой увлекательной работе, а эта работа – если подойти к ней серьезно – вполне может стать альтернативой основной специальности, какая бы она не была. Но обо всем по порядку.
В данной статье мы разберем один из фильтров поисковой системы Яндекс называемый АГС. По имеющейся информации этот фильтр имеет две модификации, причем это официально подтверждено администрацией Яндекса – фильтры именуются АГС-17 и АГС-30. Хронологически 17-й АГС появился раньше 30-го и на сегодняшний момент фильтрацией некачественных, по мнению Яндекса, сайтов занят именно 30-й номер (более совершенный с точки зрения алгоритма).
продвижение сайтов быстро: см пост на http://www.promote-my.website/besplatnaya-raskrutka-sayta/page-content/4-internet-vmesto-televizora.html
Решил порадовать мужчин и выложить подборку фотографий начинать невыносимо сексуальных девушек http://onlinegames.accountant
Pingback: November 27 ~ Gifts for Warmth | Sew Mama Sew
Looks like I’m becoming a fan of this agency, even though perhaps all french escort services are much better than english ones.
Hi supplementary website
http://sunni.muslim.purplesphere.in/?entry.felicity
georgia springs designer ablutions recapture
1
общественное мнение на ютубе – уникальный канал с опросами на ютуб, опрос наших граждан
Приветствую друзья! Кто ни будь, знает где с гарантией заказать сайт в Приморско-Ахтарске Краснодарского края?
Сейчас нельзя верить всем Web студиям. Очень жду отзывов и рекомендаций!
Подробнее напишите что Вам требуется? Сайт, интернет магазин, и т.п.
Расскажите подробнее!
Мы можем помочь сделать для Вас интернет магазин в Вашем городе Краснодаре Краснодарского края?.
Выгодно сделаем, продвинем в Яндекс, Гугл пишите на seo-websait@yandex.ru
Работаем по Краснодарскому краю, все чаще у нас заказывают с Армавира.
Звоните, мы готовы сделать для Вас, качественный и самое главное не дорогой интернет ресурс для Вас и Вашего бизнеса. Кстати наш номер +7(967)665-46-33, +7(988)667-88-72
Поговорим что такое конвейер. Представьте! Сколько, Вы сможете экономить денег на счету и своих нервов, если поставить себе такое оборудование. Выбираем конвейер ленточный как единицу автоматизации производства. Представьте! На сколько, Вы сможете экономить, если поставить на фабрику это конвейер. Давайте посмотрим по порядку:
1. Представьте у Вас карьер, для погрузки в автотранспорт задействована специальная техника, водители, рабочие, может быть, Возможно Вам нужно несколько постов, а это еще конвейер и обслуживающие сотрудники. Как быть? Экономить можно, если поставить
Силосы для зерна купить.
2. К примеру транспортёр ленточный состоит из рамы с двумя барабанами и натяжной станцией с круговой лентой. Они бываю желобчатые и прямые, со скребками и без скребков. Могут использоваться в разных видах промышленности от сельскохозяйственной, до горнодобывающей. В движение ленту приводит качественный, мощный мотор-редуктор червячного типа, но в некоторых транспортёрах ленточных моторредукторы монтируются другие. Продукт можно подавать под углом, но не более 46% при гранулированной субстанции и наличии шевронной ленты.
3. Как не очутится в лапах мошенников когда Вы решили заказать конвейер ленточный. Во-первых, на рынках РФ и СНГ, а так же в других странах много торгующих организаций, а это потеря наличных, нежели Вы обратитесь напрямую к изготовителю. Часто поподаются организации однодневки и позиционируют себя как изготовитель. Берут деньги и исчезают. Будьте внимательны в выборе поставщика.
4. Как выбрать производителя и где заказать.
При выборе производителя Вашего заказа, следует обратить внимание на следующие аспекты например: Наличие учредительных документов, срок регистрации, будь это ООО или АО, Налоговые выписки (может он не платит налоги) в идеале увидеть собственными глазами производство это снимает многие вопросы. Если есть у изготовителя отсрочка платежа или банковская гарантия это говорит о его компетенции у такого производителя можно купить
Конвейеры ленточные скребковые передвижные. без опаски.
Надеюсь, эта статья будет Вам полезна, спасибо за внимание.
Добрый день ребята! Кто ни будь, знает где выгодно заказать сайт в Химки?
Сейчас нельзя доверять всем Web студиям. Очень жду отзывов и рекомендаций!
Уважаемые!
Советую ознокомится с материалом вот ссылка: http://каталог-статей.рф/oborudovanie/vintovye-konveyery-metody-ih-primenenia.html
Наивысший Инбокс
Уже через четыре часа Вы непременно гарантированно будете знать, каким образом заработать в мировой сети интернет, тратя всего тридцать мин в день, хоть если Вы еще новичок
С Поддержкой Вплоть до Результата. Без дополнительных трат! Без Знаний и Опыта
Не важно, сколько у Вас знаний, навыков и практического опыта. Именно здесь управится абсолютно любой!
Реальный постоянный доход. Подробнее – http://www.MAXINBOX.SITE